Desk & tech / A closer look
Blurry Text on an External Monitor: Windows and Mac Fixes
Find out whether the problem is the signal, scaling, one application or pixel density. Work through the checks before paying for a new screen.
Start here
Before assuming your monitor is broken or buying a new screen, isolate the exact failure point. Verify that Windows or macOS is transmitting the panel’s true physical native resolution rather than a scaled fallback. If only a single app looks soft, configure per-app DPI scaling overrides. If the entire desktop is blurry, bypass hubs to test a direct digital connection. Replace hardware only when you run up against physical pixel density limits.
As an Amazon Associate, we earn from qualifying purchases. How our links work ↗
The useful answer
Before assuming your monitor is broken or buying a new screen, isolate the exact failure point. Verify that Windows or macOS is transmitting the panel’s true physical native resolution rather than a scaled fallback. If only a single app looks soft, configure per-app DPI scaling overrides. If the entire desktop is blurry, bypass hubs to test a direct digital connection. Replace hardware only when you run up against physical pixel density limits.
As an Amazon Associate, we earn from qualifying purchases. How our links work. Choose the exact model and seller before ordering.
Describe the blur before adjusting anything
The word "blurry" is thrown around casually in office tech complaints, but in practice it covers completely different technical problems. Are the edges of letters fuzzy and out of focus? Do fonts display strange red and cyan fringes along vertical strokes? Is the entire operating system interface uncomfortably tiny, forcing you to squint? Or is an imported screenshot looking pixelated while freshly typed words right beside it look razor-sharp?
Each symptom points to an entirely different layer of your hardware and software stack. Begin by pressing the physical menu button on your monitor casing to summon its built-in on-screen display (OSD). If the monitor's own firmware text (showing input ports, brightness, and contrast bars) looks crisp and legible while your desktop icons behind it look muddy, your panel is working normally. The problem sits squarely within your video signal, cable bandwidth, or operating system scaling pipeline.
Before toggling random sliders, document your baseline setup: write down your exact computer model, GPU, operating system version, the cable type in use (including any intermediary docks or dongles), and the native resolution printed in your monitor manual. Keeping track of where you started ensures you can revert changes quickly and methodically.
Windows 11: select the display, then resolution and scale
On Windows 11, open Settings → System → Display. Click the numbered rectangle corresponding to your external screen (use the Identify button if you are dual-screening and unsure which monitor is active). Scroll down to the Scale & layout module.
First, verify that Display resolution is locked to the setting labeled (Recommended). As Microsoft notes in its official display guidelines, driving an LCD panel below its native pixel grid forces the monitor to interpolate pixels, creating unavoidable softness across letterforms. Never downgrade a 4K or 1440p monitor to 1080p simply to make text larger; doing so throws away the crisp vector rendering you paid for.
Instead, adjust the Scale dropdown. Setting your 4K screen to 150% or 175% scaling instructs Windows to render crisp, high-density font vectors at an interface size comfortable for your eyes while maintaining native signal resolution. If font smoothing appears uneven across desktop apps, open the Windows Search bar, type Adjust ClearType text, and complete the five-step tuner to align subpixel font rendering with your panel's RGB subpixel layout.
Mac: establish the default mode before chasing sharper settings
Connecting a Mac to an external monitor introduces unique scaling dynamics. Open System Settings → Displays, select your external display, and review the available resolutions. Apple designs macOS typography around high-density Retina targets (roughly 218 PPI). When paired with standard desktop monitors (such as a 27-inch 1440p screen at roughly 109 PPI), macOS no longer applies traditional subpixel antialiasing, which can leave text looking thinner or slightly soft.
Avoid running a 4K monitor at non-Retina native 100% scaling, which renders interface elements uncomfortably small. In macOS, select the scaled option labeled "Looks like 2560 × 1440". Under this setting, macOS renders your entire desktop canvas off-screen at a razor-sharp 5K buffer (5120 × 2880) and seamlessly scales it down to your 4K physical panel, preserving smooth font curves and comfortable UI sizes.
If your Mac defaults to a low-resolution mode without offering HiDPI scaling options, hold down the Option key while clicking the scaled list, or toggle Show all resolutions to unlock HiDPI modes. Verify your active signal mode under System Information → Graphics/Displays.
If just one app is blurry, isolate that app
When system menus, web browsers, and file managers render cleanly but an older enterprise tool, accounting package, or legacy client appears fuzzy, the monitor is completely blameless. The culprit is legacy application software lacking per-monitor DPI awareness.
In Windows, dragging an older app from a high-density 150%-scaled laptop screen onto a 100%-scaled external monitor causes the operating system to bitmap-stretch the window rather than recalculating font metrics. To fix this, right-click the application executable or desktop shortcut, select Properties → Compatibility → Change high DPI settings. Check Override high DPI scaling behavior and set the dropdown to Application or System (Enhanced). Restart the application directly on the external screen to force native font rendering.
Additionally, check in-app zoom settings. If a web browser tab was accidentally zoomed to 110% or an Excel sheet was left at 85%, text will exhibit subtle visual distortion. Reset your applications to default 100% zoom before diagnosing monitor faults.
Missing native modes? Test the connection path
What happens if Windows or macOS refuses to offer your monitor’s native resolution in the settings menu? The problem almost always lies in the physical connection pipeline. Video adapters, cheap multi-port travel hubs, and legacy cables frequently choke bandwidth.
For example, an inexpensive USB-C hub limited to HDMI 1.4 can only output 4K at 30Hz, prompting laptops to fall back to 1080p to maintain 60Hz motion. To isolate the constraint, remove all docking stations, USB splitters, and switchers. Connect a direct, certified cable (such as a DisplayPort 1.4 or certified Premium High-Speed HDMI cable) directly from your computer's video port to the monitor's input.
If native resolution immediately restores upon bypassing the dock, you have found your bottleneck. Upgrading to a full-bandwidth dock or a monitor with native USB-C DisplayPort Alt Mode upstream inputs will permanently resolve the issue.
Pixel density sets a physical limit
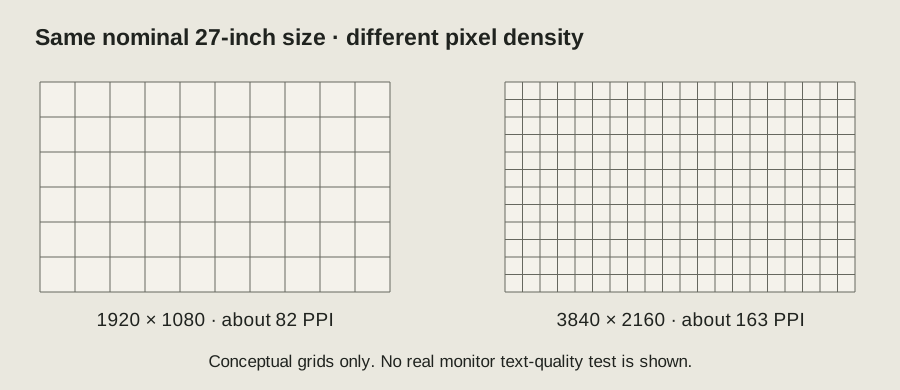
No amount of software calibration or driver tuning can generate physical hardware pixels that do not exist. Pixel density—measured in pixels per inch (PPI)—dictates the visual sharpness of typography at a given viewing distance.
A 27-inch monitor with 1920 × 1080 resolution yields roughly 81.6 PPI. At a typical desk viewing distance of 50 to 60 centimeters, individual pixel grids and stair-stepped jagged edges on curved letters (like 'e', 's', or 'o') remain clearly visible to the naked eye. In contrast, a 27-inch 4K monitor (3840 × 2160) packs roughly 163 PPI, rendering text with the crispness of printed paper.
Calculate your panel’s nominal density using the standard formula: PPI = √(Horizontal Pixels² + Vertical Pixels²) ÷ Diagonal Inches. If your daily work involves hours of reading dense spreadsheets, coding, or editing technical copy, stepping up in pixel density makes a tangible difference in long-term eye comfort.
Your text-readability checklist
Work through these checks systematically before considering hardware replacement.
Use a symptom matrix to decide what is worth changing
| Observed Symptom | Likely Underlying Cause | First Recommended Action |
|---|---|---|
| Entire desktop, taskbar, and menus appear uniformly soft | Non-native resolution signal or improper cable scaling | Confirm recommended native resolution in OS settings; bypass dock. |
| Only one legacy office program looks blurry | DPI-unaware software failing per-monitor scaling | Enable Windows high-DPI compatibility override; restart app. |
| Letters show colored red/blue fringing along edges | Subpixel font antialiasing mismatch or extreme sharpening | Reset monitor OSD sharpness to neutral; run ClearType tuner. |
| Text is razor-sharp but far too small to read comfortably | High native resolution operating at 100% default scale | Increase display interface scaling (e.g. 125%–150%) without changing resolution. |
| Pasted images or shared meeting video feeds appear fuzzy | Low-resolution source raster assets or video compression | Verify live typed text in the same window; improve source asset. |
| Text is configured natively but individual pixels remain visible | Low physical pixel density (e.g., 27" 1080p at close range) | Increase viewing distance or upgrade to a higher-PPI 1440p/4K display. |
Be cautious with built-in monitor sharpening filters. Dialing up "Sharpness" or "Super Resolution" inside your monitor's OSD frequently introduces harsh white halo artifacts around dark text strokes rather than restoring authentic detail. Keep monitor image processing set to documented neutral factory baselines.
Case one: the entire desktop looks soft after adding an adapter
Imagine your laptop screen looks perfectly sharp, but the moment you connect your external monitor through a new multi-port USB-C adapter, everything from the taskbar to browser text appears fuzzy. Before blaming the screen, examine how your operating system negotiates display bandwidth.
When a display adapter lacks the throughput required for native 4K or 1440p at 60Hz, the operating system often silently downgrades the output to 1080p. The monitor then stretches those 1920 × 1080 pixels across its physical 3840 × 2160 hardware matrix, resulting in immediate fuzziness. Disconnecting the adapter and plugging in a direct DisplayPort or HDMI cable immediately confirms whether the adapter was throttling your resolution.
Case two: the browser is clear, but one application is blurry
Consider a scenario where your web browser and code editor look immaculate, but opening an older corporate accounting tool or legacy utility yields blurry, unreadable fonts. This occurs because the application lacks modern dynamic DPI awareness.
When an application written for fixed 96 DPI environments runs on modern mixed-DPI multi-monitor setups, Windows bitmap-stretches the window when moved between screens. Configuring a permanent DPI override in application properties or launching the program directly on your primary external screen forces the application to render text natively, resolving the issue without spending a penny.
Case three: the image is correctly configured, but the pixels are still visible
Suppose you have verified native 1080p resolution, set recommended 100% scaling, and confirmed a direct digital cable, yet reading text across a 27-inch display still feels rough on your eyes. Here, you have run into the physical limits of panel density.
Spreading 1080 vertical lines across a large 27-inch diagonal yields roughly 82 PPI. If your desk is shallow (50cm to 60cm deep), your eyes sit close enough to discern individual pixel borders. If your daily workload demands hours of dense reading, upgrading to a 24-inch 1080p screen (93 PPI) or a 27-inch 4K screen (163 PPI) is the only permanent solution. Check our 27-inch 4K vs QHD guide to choose the right resolution for your desk depth.
Gather useful evidence before calling a panel defective
If you suspect an actual hardware panel defect, gather empirical evidence. A digital operating system screenshot captures the framebuffer before signal output; if text in a screenshot looks razor-sharp when viewed on your phone, the graphics card is generating clean vectors. Taking a close-up macro photograph with your smartphone captures physical panel subpixels, helping identify whether subpixel antialiasing or optical coating grain is responsible.
Always test your monitor using a secondary computer or alternate input port before initiating a warranty return. Documenting verified signal modes and testing across independent hosts prevents misattributing a simple cable or driver glitch to physical panel failure.
A sensible stopping point for troubleshooting
Troubleshooting is complete when your monitor receives native resolution at full refresh rate, interface scaling renders fonts at a comfortable physical height, and text across your primary working applications is smooth and stable. Do not obsess over microscopic font rendering under a magnifying glass; your workspace exists to facilitate productive, distraction-free work.
Keep a brief note of your working settings and cable specifications. Should a future operating system update alter your display profile, you will have a clear, documented baseline to restore your clean, sharp workspace effortlessly.
Before you decide.
Will an expensive cable sharpen an already correct signal?
No. Digital video transmission either carries the complete bitstream or drops out entirely. If your monitor is already receiving its native resolution at full refresh rate, swapping cables will not add physical pixels or sharpen typography.
Is 100 percent scaling always the sharpest choice?
No. On high-density 4K displays, running 100% scaling makes interface elements and fonts microscopic, leading to severe eye strain. Running 150% or 175% scaling preserves vector sharpness while providing comfortable, readable font sizes.
The next good question
Keep exploring.
 Read the story ↗
How to Choose a Monitor for Work: Size, Text and Laptop Connections
The best work screen is the one that fits your desk, your eyes and your computer. Start with those three checks before paying for a longer feature list.
 Read the story ↗
Two Monitors Show the Same Image on a MacBook: What to Check
Two physical screens do not always mean two independently addressable displays.
 Read the story ↗
USB-C Laptop Desk Setup: A Practical Six-Piece Kit
One screen, fewer loose connections and six clearly defined jobs. Start with the laptop's limits, then buy only the pieces your desk is missing.